Connacht and the Myrkridia
Connacht is described as a hero of the Wind Age. The manual places the Myrkridia conflict roughly a thousand years before the events of the first Myth, establishing the older cycle that later histories refer back to.
 JESSE GUILESWEB DESIGN
MYTH II · FIELD ARCHIVE
An independent, source-conscious archive for Myth II: Soulblighter. Campaign history, characters, units, multiplayer, and mapmaking are organized as direct reference material, with documented facts kept separate from observations and open questions.
Open campaign history Browse the sources Download the reference book ↗
Reviewed 2026-09-16 · Manual and transcript links checked in a browser. Claims without primary runtime evidence remain marked as cross-checks or open research.
01 · CAMPAIGN HISTORY
The broad sequence below is grounded in the Bungie manual’s introduction, glossary, and campaign framing. Where a detail comes from a fan chronology or an inference, it is labeled.
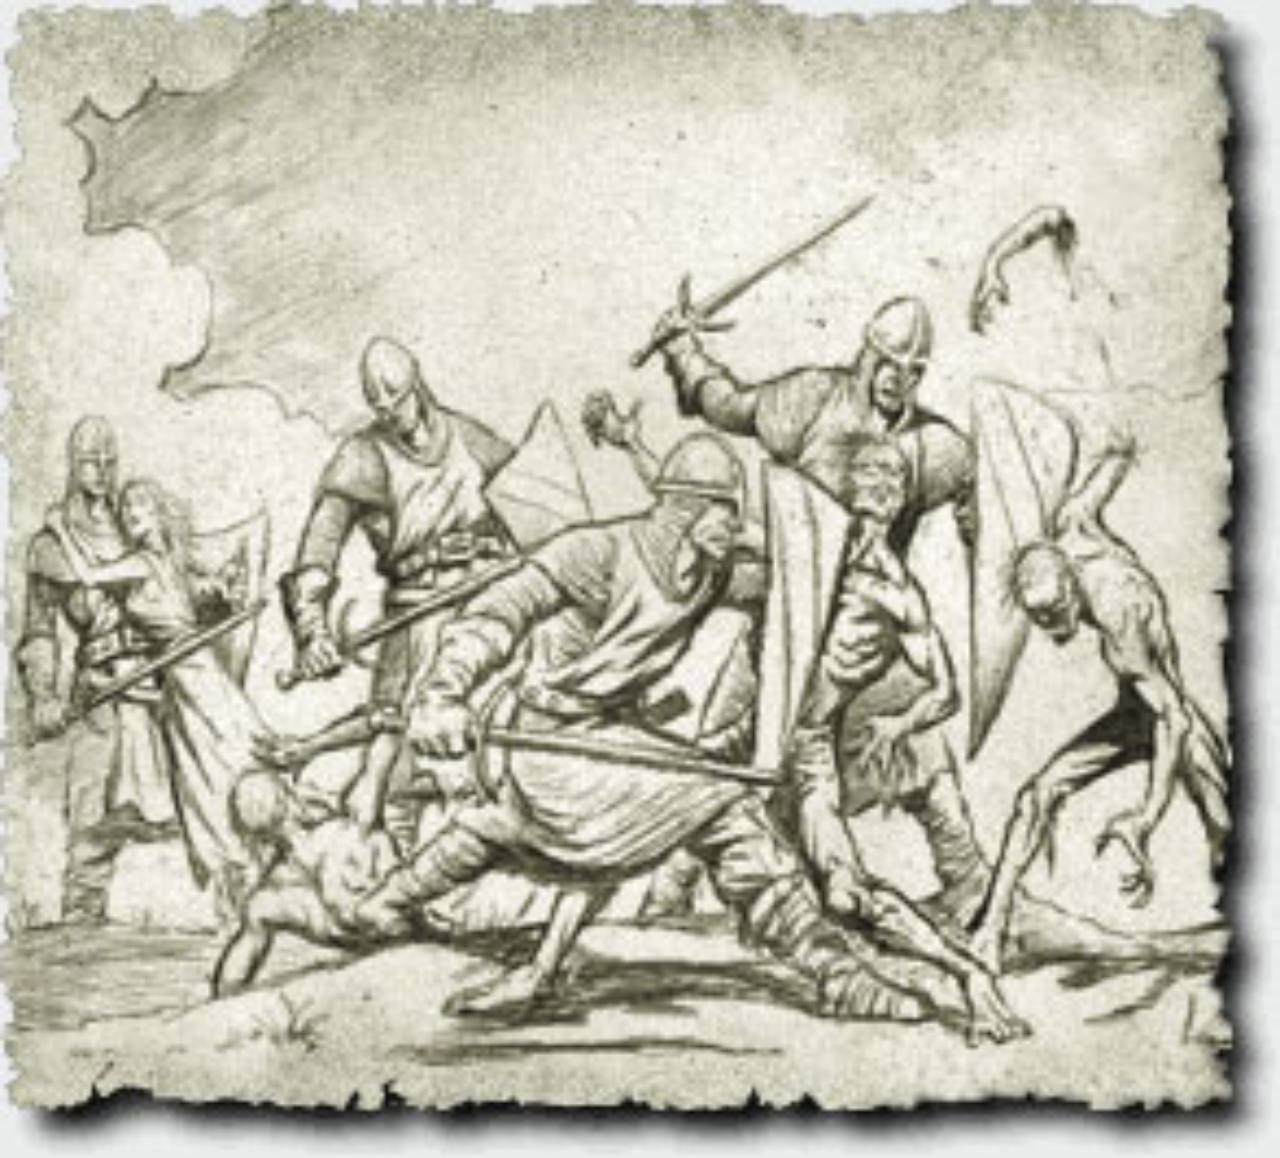
Connacht is described as a hero of the Wind Age. The manual places the Myrkridia conflict roughly a thousand years before the events of the first Myth, establishing the older cycle that later histories refer back to.
Connacht trapped the Myrkridia in the Tain and imprisoned the Trow. After he disappeared from Muirthemne, that period of peace ended.
The Callieach fought the Trow and destroyed themselves rather than be hunted to extinction. The manual identifies the resulting chasm near Myrgard as the Great Devoid.
The manual says Balor first appeared at the eastern edge of the civilized lands more than a century before Myth II, heralded by a comet. He raised the Fallen Lords and led the Dark against the living. Alric later defeats Balor at Rhi’Anon; Balor’s head is cast into the Great Devoid so it cannot return.
Balor’s armies destroyed Muirthemne, scattered its survivors, crossed the Cloudspine, and flooded the rich western lands. The manual says only two great western cities still stood when the Light rallied.
The Legion fought through the Fallen lines to Rhi’Anon and sacrificed itself to give Alric time to trick and decapitate Balor. Most Fallen Lords were hunted down after Balor’s destruction; Soulblighter escaped into the wilderness.
Myth II begins sixty years after the Great War. Alric rules from the rebuilt city of Madrigal, while the Legion and other survivors have returned to ordinary settlements.
Dwarves returned to Myrgard and Stoneheim after the Dark’s defeat. The Trow withdrew north and held a truce with the humans who had fought them during the war.
Campaign journal material begins with the patrol investigating grave robbing and an attack at Willow Creek. Rurik is rescued among the captured peasants in the fan-maintained chronology; treat that line as a cross-check target against the game journal, not a substitute for it.
The Willow Creek and Salvation transcripts are both dated Monday August 25. Crüniac’s patrol is sent after reports of grave robbing and black smoke near Willow Creek; the follow-up account describes villagers held at the cemetery and a rescue-and-escort objective. These entries are campaign cross-checks until the in-game pages are captured.
Two late-campaign entries connect the Tain’s destruction to the next Myrkridia crisis. Relic places the search for a Tain shard in Forest Heart; The Summoner follows inside the shattered Tain and identifies the Summoner as the figure working to resurrect the Myrkridia. The mission transcripts are fan-hosted evidence, not a replacement for the game journal.
The fan transcript for Wednesday September 17, Plain of Scales, reports that Soulblighter killed Crüniac and that a journal was recovered from his belongings. Keep this as a dated arc cross-check; confirm the wording against the runtime journal before treating it as primary canon.
Exact mission dates, some character relationships, and the boundaries between manual glossary text and campaign dialogue need page-level citations or captured in-game journal evidence before being treated as settled.
The first Myth campaign is the historical lead-in to Soulblighter. Myth Journals indexes 25 dated transcript entries from the opening at Crow’s Bridge through the Great Devoid and the final battle. Use this as a reading order and cross-check; it is not a replacement for captured in-game journal pages.
The earlier campaign begins with the Light responding to a Dark assault near Crow’s Bridge. The transcript index provides the mission order; the manual remains the authority for the larger Great War history and the roles of Balor, Alric, and the Fallen Lords.
The indexed missions move through Bagrada and Forest Heart before the Light enters the Tain. These locations connect the campaign’s military route to the older Connacht, Trow, and Myrkridia history recorded in the Myth II manual.
The closing entries lead to the Great Devoid and Rhi’Anon, where the Light’s final assault gives Alric the opening to defeat Balor. Keep transcript details labeled as fan cross-checks until a page-level runtime capture is available.
02 · EARLIER CAMPAIGN
The first campaign is the direct historical lead-in to Soulblighter. The Myth Journals index supplies 25 dated entries; the route below turns that source into a readable sequence while keeping it labeled as a fan cross-check.
The Light responds to the first Dark assault, then moves through the King’s Highway and the siege of Madrigal.
The campaign crosses Covenant, Stoneheim, the Plain of Scales, and the Bagrada pass before reaching the Barrier.
Forest Heart leads into the Tain and the Smiths of Muirthemne, connecting the Great War to Connacht’s older history.
The final route follows the Watcher, the Gjol, and Rhi’Anon. The final indexed entry is The Great Devoid.
Open the index for all 25 dated mission pages. Transcript wording remains secondary until corresponding in-game journal pages are captured.
03 · CHARACTER RECORDS
These entries are intentionally concise. Each separates a documented role from interpretation so the page can grow without turning guesses into canon.
King of the rebuilt human realm after the Great War. The manual places him on the throne in Madrigal sixty years before Soulblighter’s return.
A surviving Fallen Lord who escapes after Balor’s defeat and later attempts to regain power. The manual frames his return as the crisis of Myth II.
A Fallen Lord who fought Rabican at Madrigal. The manual says Rabican defeated her in a dream duel using knowledge revealed by the Head.
A Fallen Lord whose forces fought in the Dire Marsh. He was crippled by arrows tipped with his own bones and fell there.
A Fallen Lord whose rivalry with the other generals contributed to his downfall. His army was decimated by the Watcher at Seven Gates.
The manual identifies Balor with Connacht, the Wind Age hero. Keep the names together in searches; they refer to different points in the same historical identity.
Leader of the Legion at the opening of Myth II. Campaign framing presents him as the officer directing the patrol through the early crisis.
A villager encountered in the Willow Creek sequence. Fan chronology notes describe him as carrying information about Baron Kildaer; verify the exact line against the campaign journal before expanding this entry.
The manual says the Baron appeared out of nowhere ten years earlier, then claimed Keep Kildaer and its surrounding lands with brigand support.
A severed head animated by arcane magic. The manual records its role in creating conflict among the Nine.
The manual’s glossary describes the Nine as a group whose internal conflict was influenced by the Head. Later fan interpretations are kept separate.
One of the Nine. He faced Shiver at Madrigal and defeated her in a dream duel using knowledge revealed by the Head.
One of the Nine who opposed Balor. He was trapped in the Tain with Murgen and the Legion and died when the Tain was destroyed.
One of the Nine trapped in the Tain with Cu Roi and the Legion. The manual records that he did not survive its destruction.
One of the Nine who was severely wounded in battle at Bagrada near the end of the Great War.
The manual identifies Moagim as Tireces, the savior of the Age of Reason, in another incarnation as the Leveler.
Unoccupied since the Great War and believed to have lost the Kildaer family when the Fallen crossed the Cloudspine. The manual connects the keep to the Baron’s rise.
CHARACTER CONNECTIONS
This index shows only explicit links between named figures. Manual-backed connections and transcript cross-checks are labeled separately.
The manual identifies Balor as Connacht at a later point in the same historical identity.
Alric defeats Balor at Rhi’Anon, cuts off his head, and casts it into the Great Devoid.
The Head’s influence contributes to conflict among the Nine. Later interpretations remain separate.
The opening journal places Crüniac’s patrol and Rurik in the Willow Creek/Tallow sequence. Verify the exact relationship in the game journal.
The manual documents the Baron’s claim to the keep; the mission transcript supplies the patrol’s secret-exit and kill objective.
Beyond The Cloudspine reports Crüniac’s death at Soulblighter’s hands. Treat this as transcript-level until runtime capture.
03 · LOCATIONS & TERMS
These short records come from the manual glossary. They give the campaign a stable geographic index without adding unsupported interpretation.
The southernmost pass across the Cloudspine, connecting the Plain of Scales with Forest Heart through dead ends and box canyons.
Once the fertile Cath Bruig empire; it was razed and blighted after Muirthemne fell, becoming an arid desert east of the Cloudspine.
A north–south range across the continent. Its three named passes are Bagrada, Seven Gates, and the Stair of Grief.
An old forest east of the Cloudspine and home to the Forest Giants; the Great War reached it repeatedly.
A bottomless chasm created when the Callieach destroyed themselves and their Trow hunters. Balor’s head was cast here after Rhi’Anon.
The ancient capital of Cath Bruig and Connacht’s Wind Age seat. Balor’s armies sacked it during the Great War.
The ancestral Dwarven city, seized by the Ghôls for more than fifty years before the Dwarves returned after the Great War.
The ancient Trow capital and Balor’s fortress. Alric defeated Balor here in the final battle of the Great War.
One of the three passes, marked by seven chokepoints. The Legion fought through the Watcher and Deceiver’s forces here.
A small farming town on the western edge of Forest Heart, built on the site of a razed village and attacked at the campaign’s opening.
A major city of the Province sacked by the Dark during the Great War.
A swamp fed by the poisoned Gjol River; the Watcher fell here after arrows tipped with his own bones crippled him.
Powerful artifacts. The manual credits one with helping Alric defeat Balor.
A poisoned river flowing from the Blind Steppes into the Dire Marsh.
A legendary Cath Bruig crown; eleven ordinary copies were made to hide the true one, which was missing when Muirthemne fell.
The Light army that broke through to Rhi’Anon and sacrificed itself to give Alric time to defeat Balor.
A northwestern city defended by the Light before falling shortly before the Great War ended.
A vast lowland east of the Toven River that rises toward Bagrada.
A lost Trow city and the first to fall in the Trow–Oghre wars.
The main river of the southwest, flowing from the Cloudspine to the ocean.
The northernmost passage through the Cloudspine.
A prophecy about a person who will resurrect the Myrkridia.
A town, fortress, and waterfall on the Meander River southeast of Tandem.
A river between Forest Heart and the Cloudspine that empties into the Cavan Bight.
The former empire centered on Muirthemne. The Fallen sacked its capital and turned the lands east of the Cloudspine into the Barrier.
Massive wooden inhabitants of Forest Heart. Their conflict with the Trow predates the Great War.
Knuckle-walking people who served the Dark and fought the Dwarves for generations. They occupied Myrgard and Stoneheim before the Dwarves returned.
An artifact created by the Smiths of Muirthemne. Connacht used it to imprison the Myrkridia and the Trow.
An ancient volcano overlooking Seven Gates and the setting of the final pursuit of Soulblighter.
A major Dwarven city captured by the Ghôls during the Great War.
Ancient relics that allow near-instant movement from place to place.
A magical book said to contain the fate of every creature that will ever be born.
A fearsome race from the distant past that destroyed itself and its Trow hunters, leaving the Great Devoid.
The royal crypt of the Cath Bruig and the burial site searched for the Ibis Crown.
A large Province city sacked by the Dark ten years before the current events.
A small town outside Madrigal.
A small town outside Madrigal.
A small town outside Madrigal.
A small mining town near Seven Gates.
04 · FACTIONS & UNITS
The gallery below is a visual index, not a replacement for sprite/tag evidence. Labels now follow the visible subject or the title printed on each Vera plate: the explicit SOULLESS, MYRKRIDIA, MYTH THRALL, and WIGHT sheets are cataloged by those names; the unlabeled gray reanimated sheet is kept as a provisional Ghast study. Mechanical notes are cross-checked against the Bungie manual; “Myrk” is presentation shorthand for the manual’s Myrkridia.
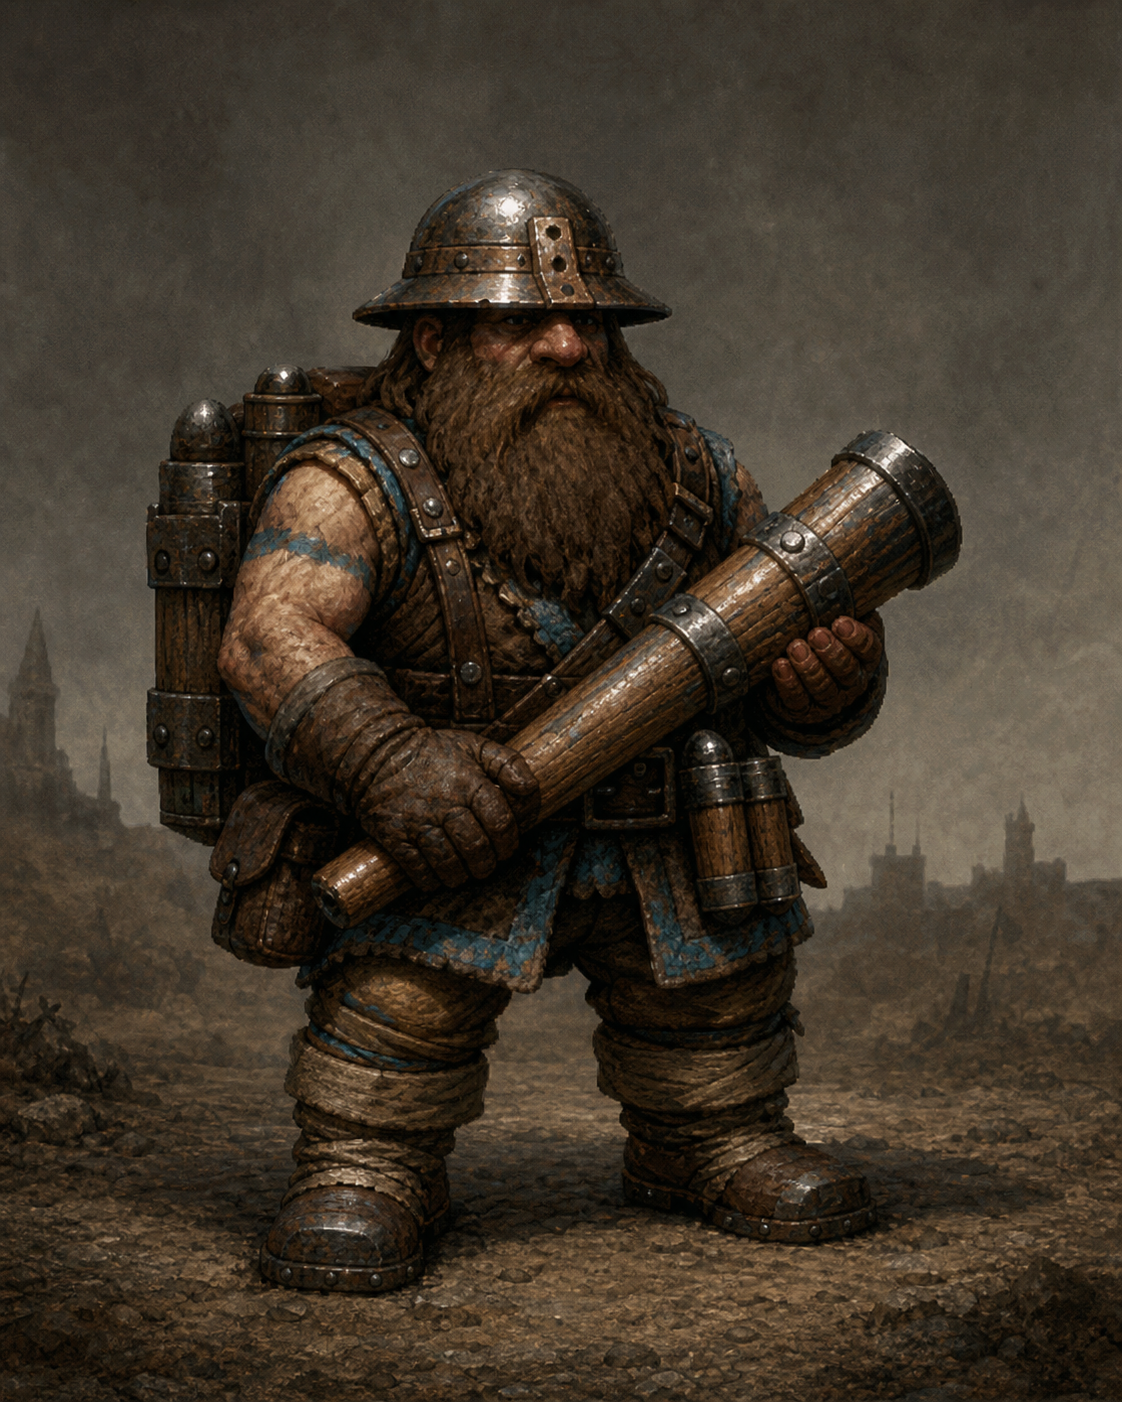
Explosive bottles and satchel charges; four by default, up to nine carried.
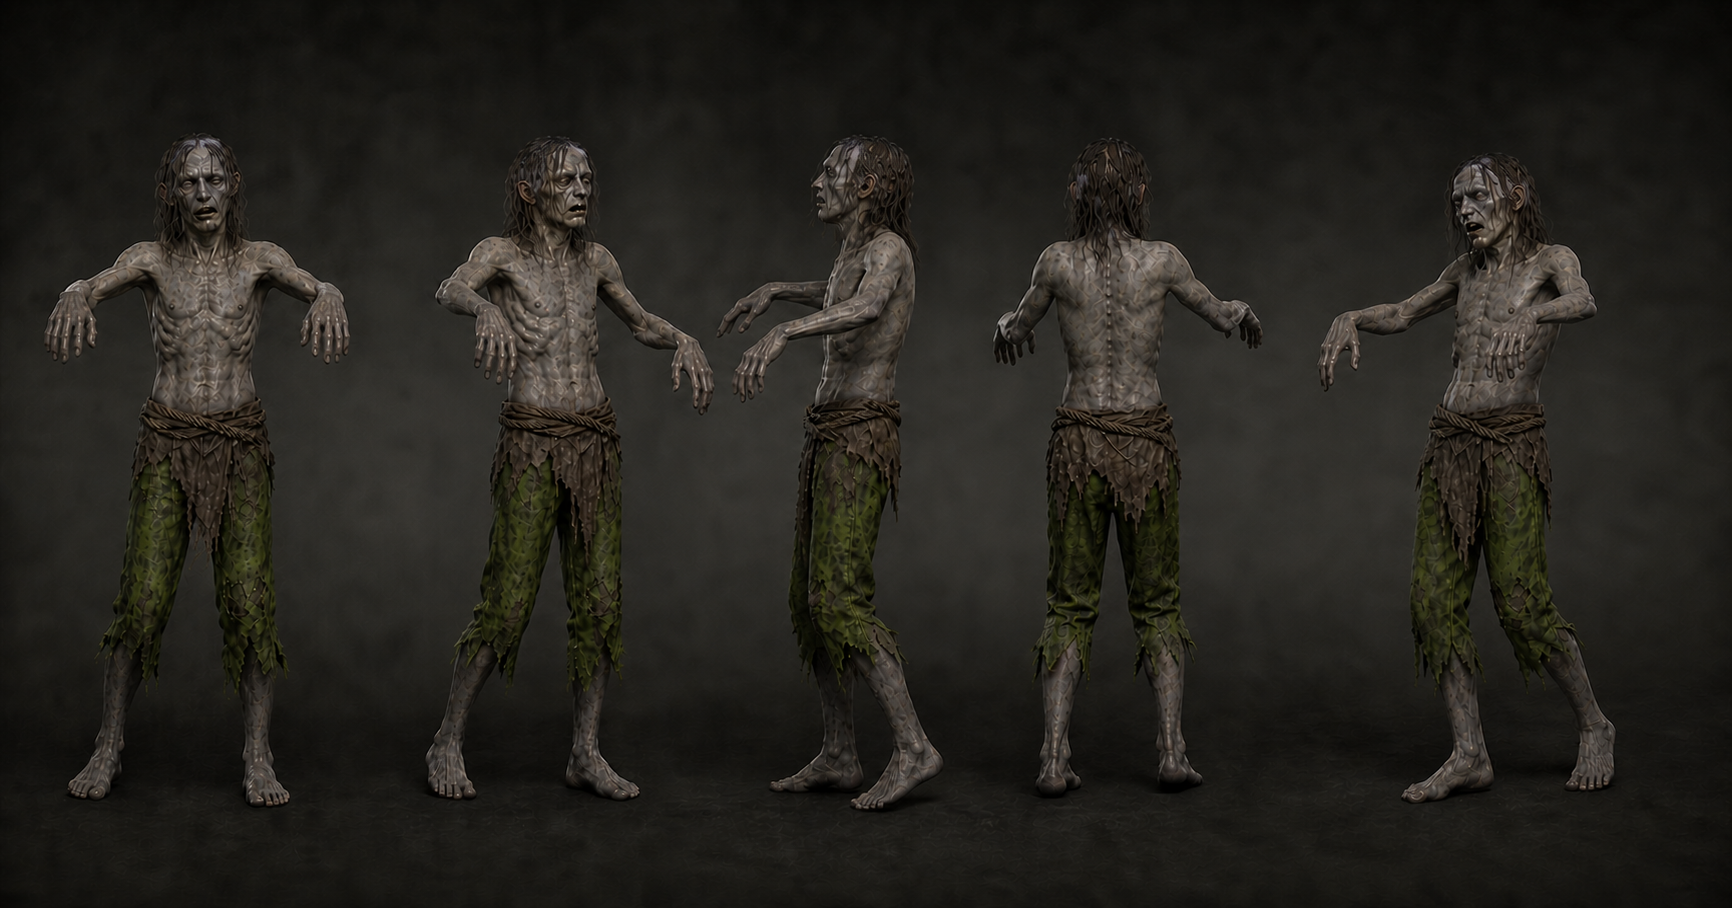
Reanimated commoners; nimble undead whose touch can stun. The supplied plate has no printed title, so the visual match remains provisional.
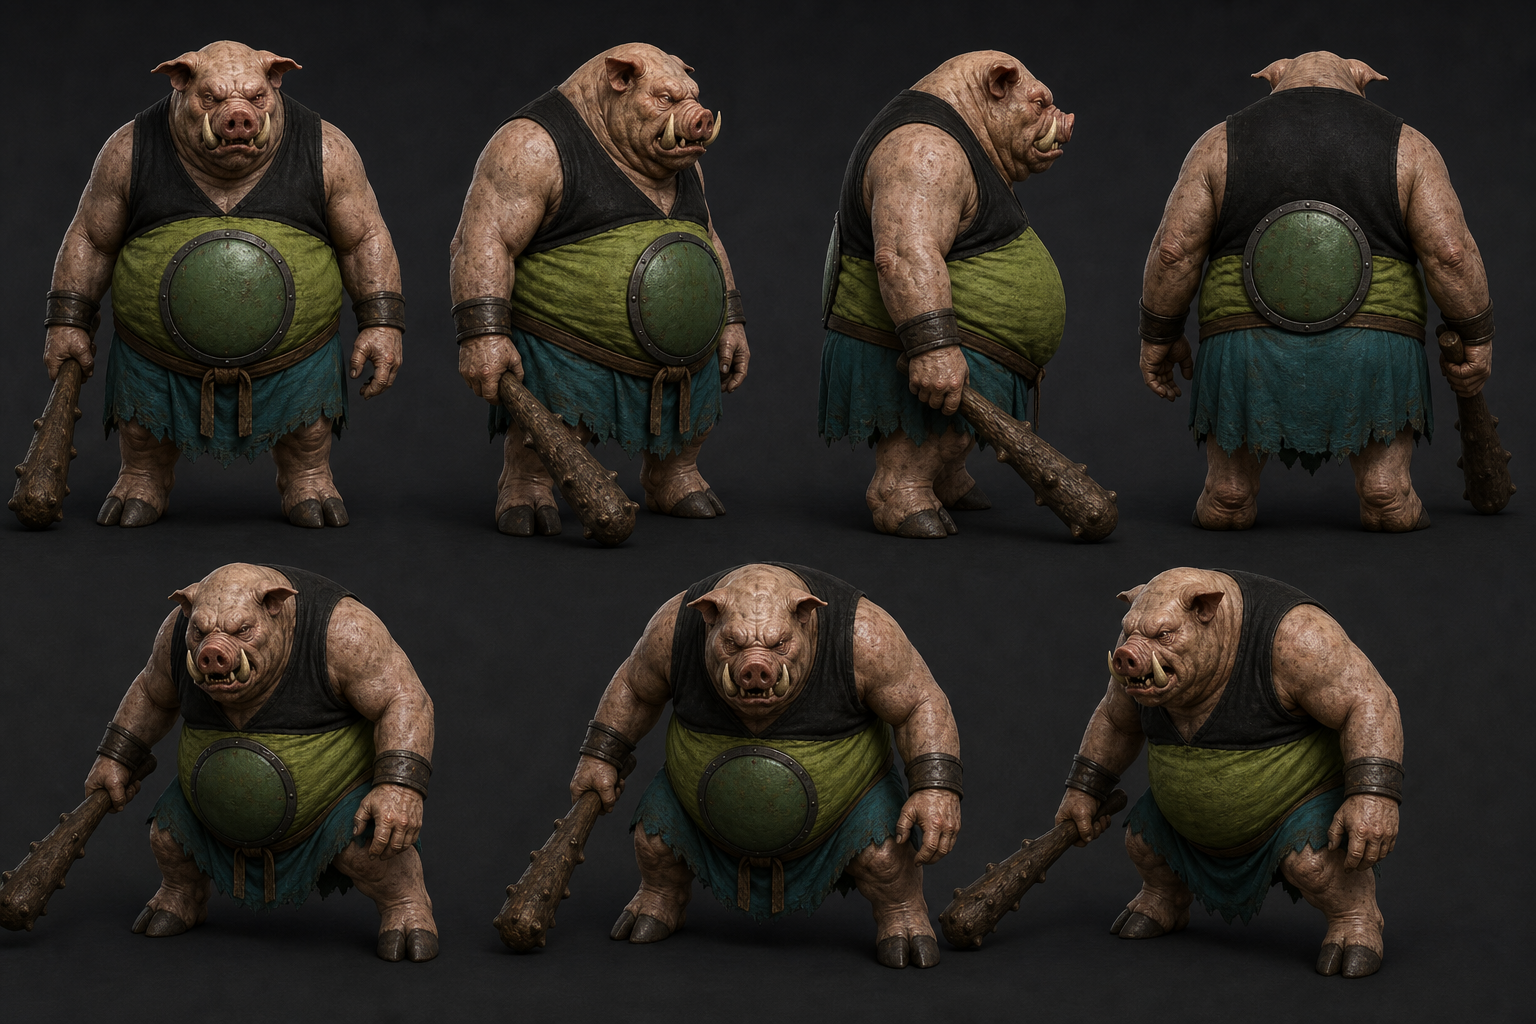
Armored brutes from the Blind Steppes; slow, durable, and club-bearing.
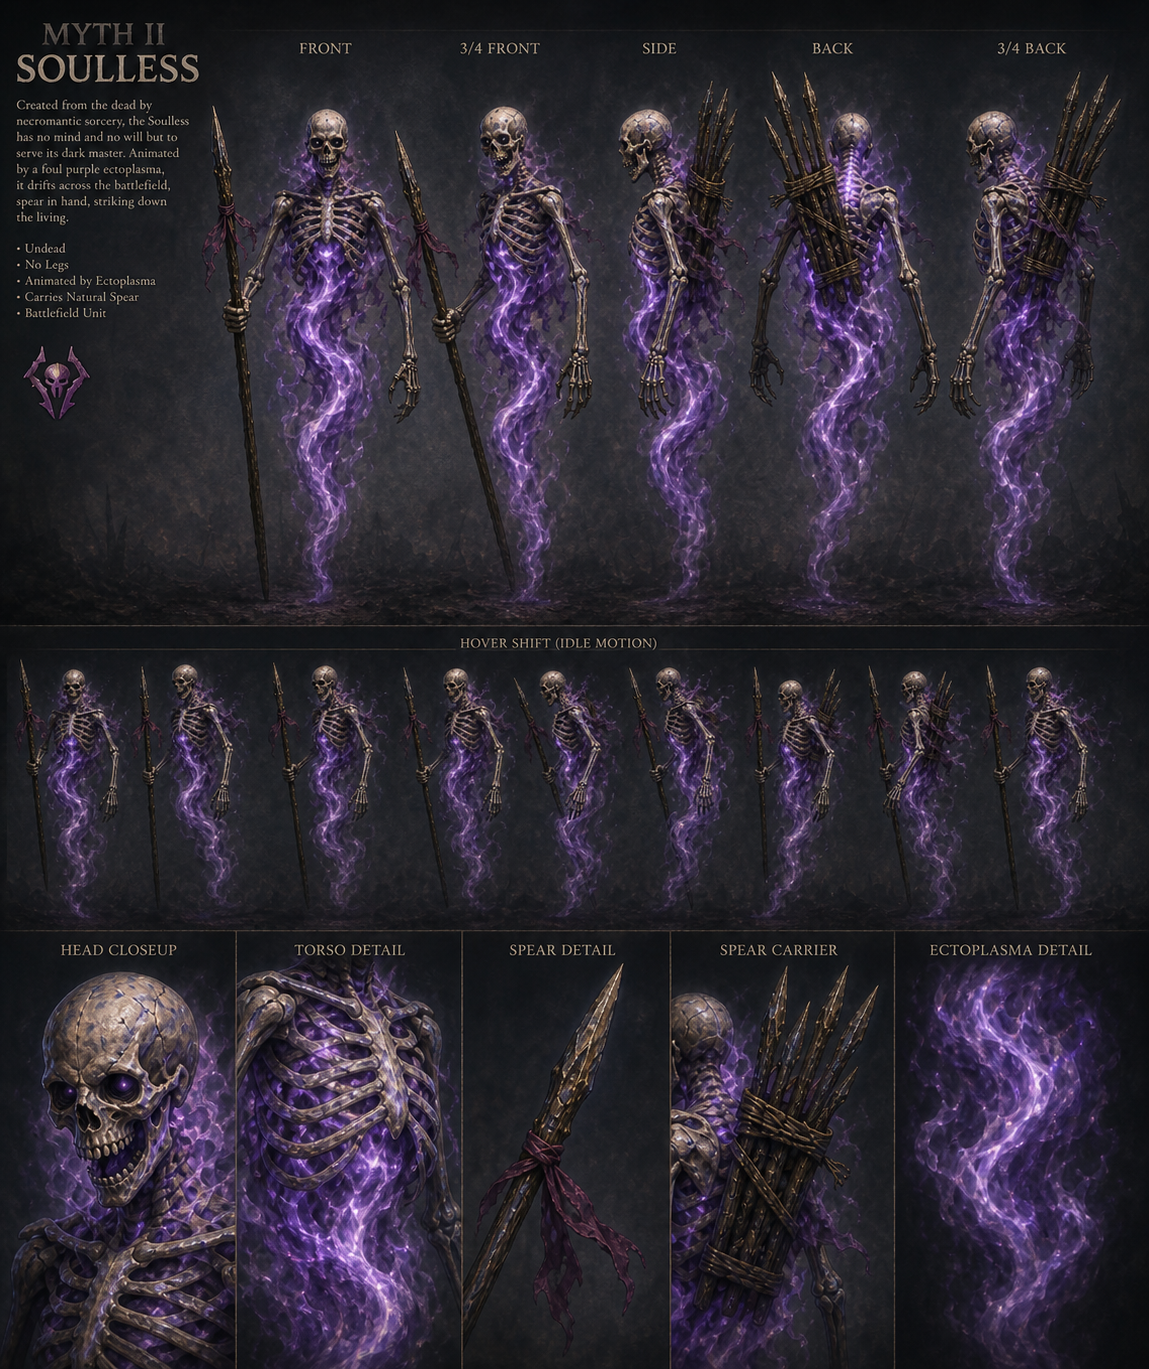
Explicit plate title: SOULLESS. Floating undead with barbed, toxin-coated javelins; a Soulblighter reanimation experiment.
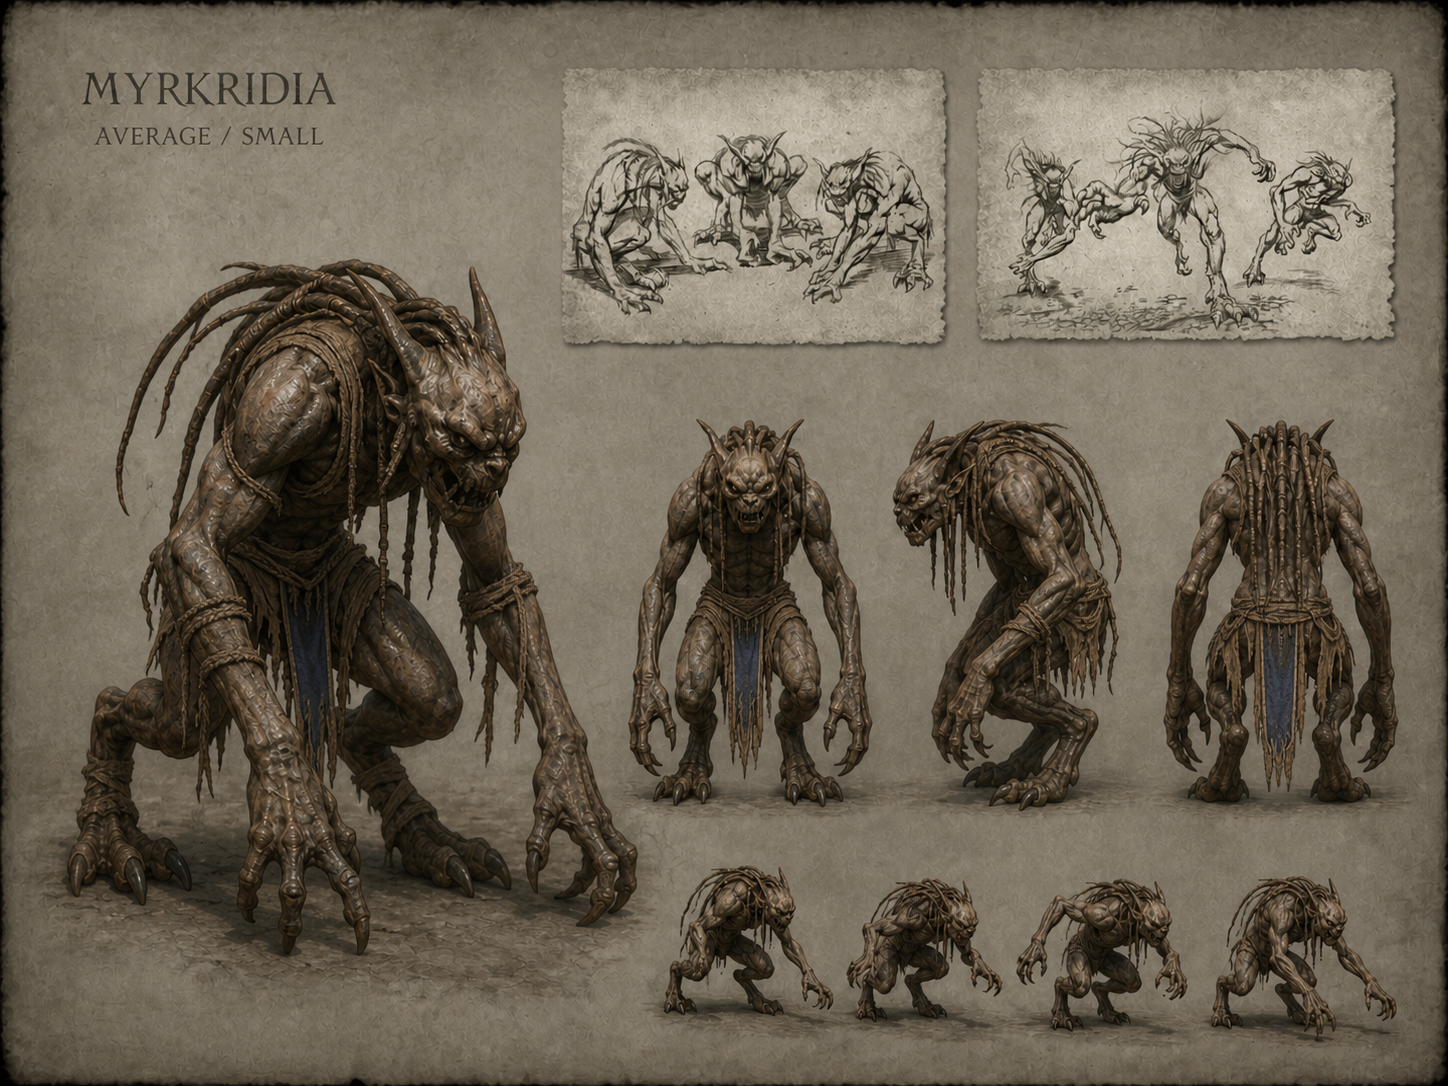
Explicit plate title: MYRKRIDIA. “Myrk” is the short catalog label for the flesh-eating race the manual says Connacht trapped in the Tain.
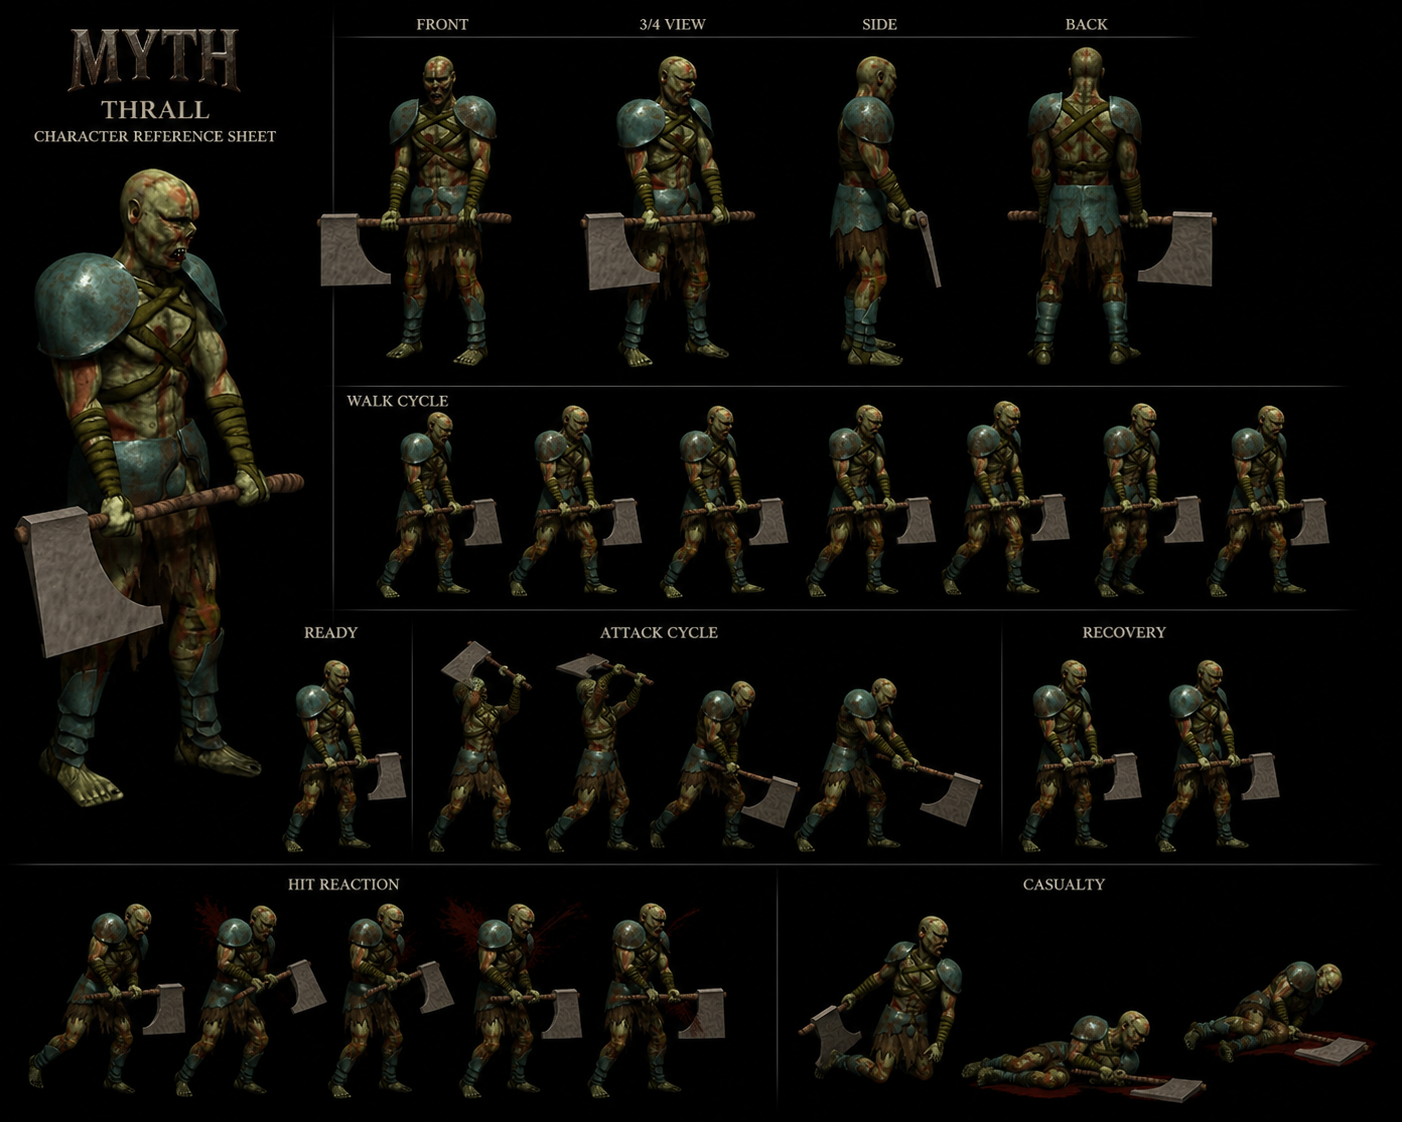
Explicit plate title: MYTH THRALL. Slow, resilient reanimated human corpses armed with axes; they do not need to breathe.
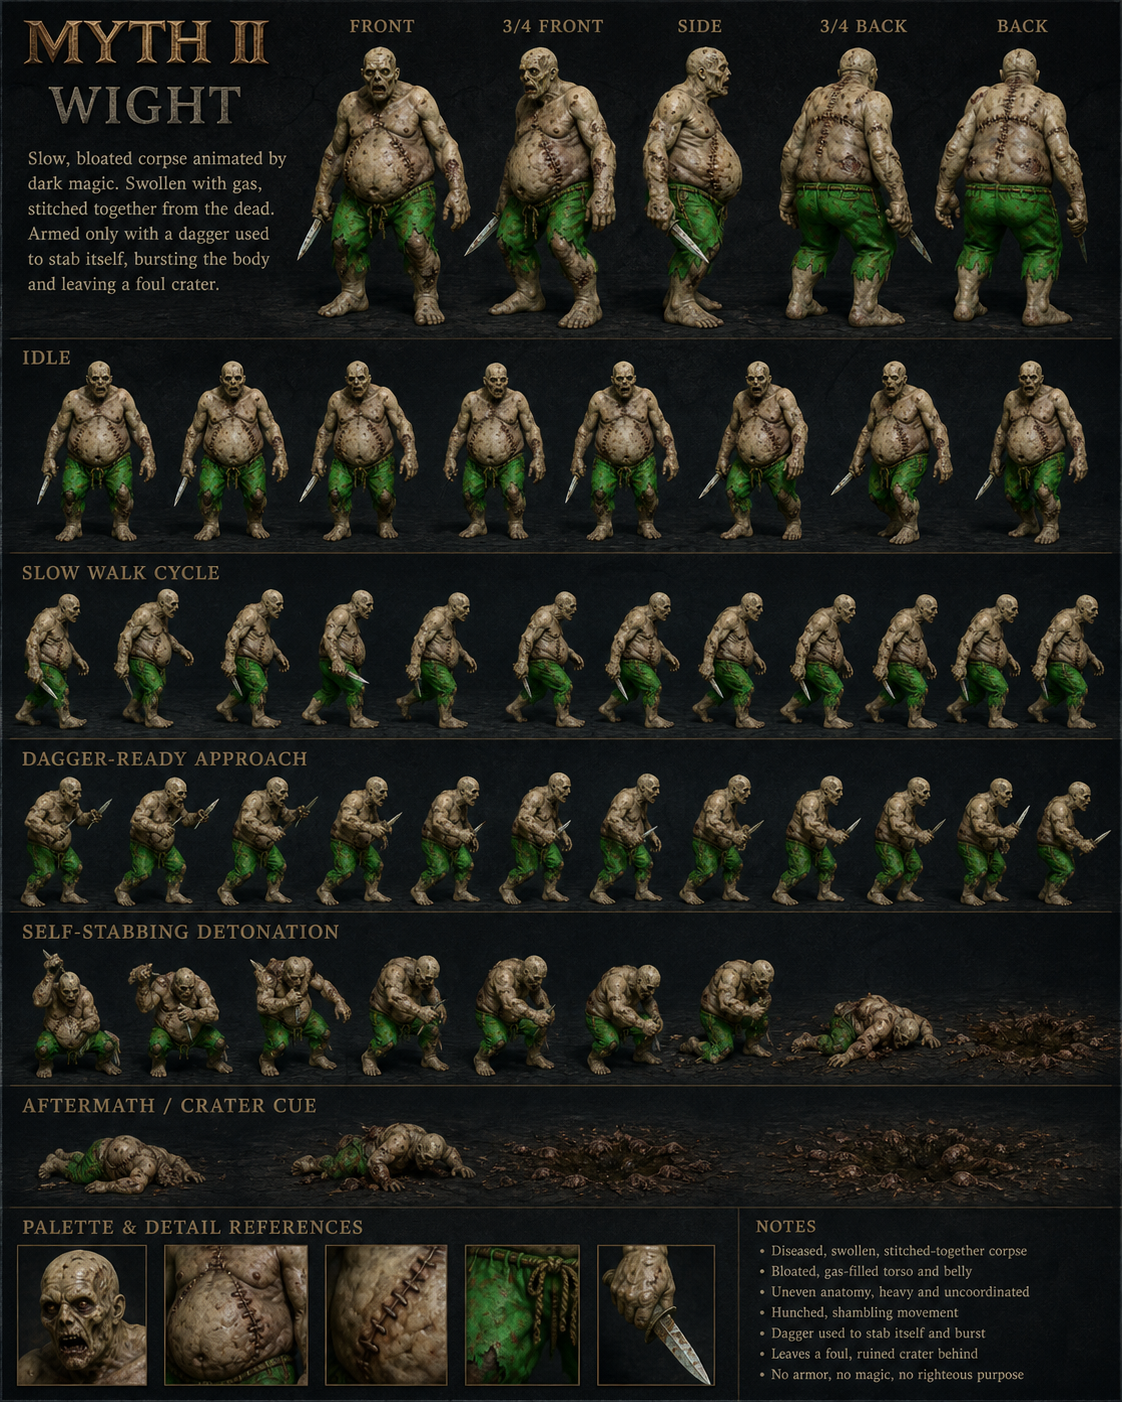
Explicit plate title: MYTH II WIGHT. Stitched corpse filled with gas; its close-range detonation causes blast damage and paralysis.
Featured plates use Vera-supplied AI-assisted studies. The roster below is the manual-backed text index; entries without plates are intentionally text-only until an approved image is available.
Human northern warriors who trade armor for speed and fight with giant claymores. Their eagerness to attack can make them difficult to control.
Human militias modeled on the fir’bolg. They attack from range and carry a fire arrow as a special action.
Former Cath Bruig guards who developed healing skills after Muirthemne fell. They can heal living and undead units and fight with a shovel.
A Dwarven experimental unit using early mortar technology. The manual describes the weapon as erratic and devastating.
Veteran human infantry carrying swords and shields.
Secretive inhabitants of the Ermine who use the bones of sacrifices as weapons. Their long conflict is with the fir’bolg.
Dark counterparts to Warriors and Bowmen. Brigands are undisciplined and slower than Warriors; both serve Soulblighter’s banner.
Priestesses summoned by Balor from another world. Stranded after his destruction, they serve Soulblighter in exchange for a promised route home and attack with electricity.
Swift scouts armed with cleavers. Ghôls can pick up battlefield debris—including explosives and body parts—and throw it at enemies.
A rare magically animated suit of armor created by Soulblighter. It uses a huge battle axe and is unharmed by arrows.
A former Scholomance ally of the Deceiver. Warlocks use a primary fireball and a secondary confusion spell.
Large subterranean spiders with no allegiance. Their numbers and size make them dangerous despite weak constitutions.
Ancient giants who retreated north after the Great War and maintain a truce with humans. Their kicks can tear a target apart.
Warriors who betrayed the Light for promised immortality. Their decayed bodies are bound by rotting bandages and carry two Gridaksma blades.
Reanimated corpses of long-dead sorcerers. The manual says they avoid running water and act as conduits for Fallen magic.
Former enemies of human nations who joined the Light against the Fallen, then returned home under a truce and refused to fight outside their borders.
Sturdy craftsmen who work with fire and stone. After the Great War they returned to Myrgard and Stoneheim, their homelands after Ghôl occupation.
Bestial knuckle-walkers who served the Dark and fought the Dwarves for generations. Their occupation of Myrgard and Stoneheim ended after the Great War.
06 · REFERENCE ROUTES
Use these direct routes to move through the archive. Each route points to a concrete source, transcript, or test record without turning the page into a course or a checklist.
06 · HOW TO PLAY
The controls below are default Myth II interactions reported by the manual and the controls research thread. Key bindings can be customized; use F8 in-game to confirm the current layout.
Click a unit to select it. Drag a box around several units, double-click a unit to select nearby units of the same type, or Shift-click to add or remove an individual unit.
Click the ground to move a selected unit or group. Click an enemy to issue an attack order. Watch the cursor and order feedback before sending the group forward.
Y starts team chat; Shift + Y yells to everyone. Type the message and press Enter. Hold the Up Arrow to review recent messages.
Play a short scenario with one group. Select, move, attack, read the objective, and pause to inspect the result. Repeat with a second group before adding formations or special actions.
Open the objective and journal text at the start of a mission. Identify what must be protected, recovered, escorted, or destroyed; a victory condition is not always “defeat every unit.”
Controls may differ by version, plugin, or custom bindings. Treat the F8 key list and a current in-game check as stronger evidence than a remembered shortcut.
07 · BATTLE PRACTICE
These recommendations are player guidance synthesized from documented unit mechanics, not official Bungie doctrine. The unit cards remain the authority for individual abilities; this section turns those abilities into repeatable habits.
Keep melee, ranged, support, and specialist units in readable groups. Confirm the selected group before issuing an order so a fragile unit does not inherit a frontline move.
Bowmen and other ranged attackers need room and time. Hold them behind the first contact, then reposition when the enemy closes instead of letting the whole line collapse into melee.
Dwarves carry explosive bottles and satchel charges; Mortar Dwarves use an erratic mortar. Leave separation from friendly units and wait for a clear target before committing the special attack.
Journeymen can heal living and undead units. Pull the damaged unit out of immediate danger, create space, and then heal rather than asking the Journeyman to stand in the same collision.
Soulless javelins, Fetch electricity, Warlock spells, Ghôl debris, and Wight gas each change the safe distance. Identify the threat from the unit record before choosing a target or formation.
After a failed engagement, change one variable: spacing, target, timing, or group composition. Record what happened and keep the result as practice guidance, not a new canon rule.
06 · MULTIPLAYER & COMMUNITY
The community layer is useful when it is treated as a measurable source, not a popularity claim. Bagrada exposes live games, rankings, Discord integration, and match records; Scout snapshots are dated and marked as observations.
Map, game type, start time, duration, difficulty, ranked state, player/team counts, host, kills/losses, damage, chat, plugins, and film when available.
Use the Bagrada FAQ ↗On 2026-08-09, one-player King of the Map sessions appeared on Majestic Falls – 2t Trow, Smash the Mirror TE (Trow), and Complacence (2T Trow) and lasted roughly 3–12 seconds. Body Count entries on Mudpit Massacre (Dark) and RDF Massacre! lasted roughly 23 and 53 seconds. These are classified as test-like observations.
Co-op activity included 1944-Where Tigers Dread, Fifteen on Crow’s Bridge, Bowmen Grounds (Solo), and The Greatest Library (Lite).
Historical Scout snapshot; not a current popularity ranking. Raw rows and films still need a fresh capture.
Use films and records to choose maps worth studying, compare game types, and document what a released plugin actually does. Keep the raw record beside every summary.
07 · SOURCE LEDGER
This ledger is the page’s update spine. New material should be added with a source, date checked, evidence level, and the section it changes.
Campaign framing, history, glossary, character descriptions, controls, unit notes, and multiplayer rules. This is the default citation for factual lore claims.
Updated Loathing and Fear documentation, readmes, and mapmaking changes. Use it for tool behavior and version notes, not campaign canon.
Explains what changed across 1.3–1.8.5, including interface, multiplayer, compatibility, and high-resolution asset work.
Documents room types, ranking categories, Discord integration, and the fields exposed by the live community service.
A 1999-era fan handbook with walkthroughs, unit guides, and mapmaking material. Use as a secondary guide and label it as fan-authored.
Placement specimens, controls notes, scout observations, artwork provenance, and open runtime gates. Updated alongside the site.
Dated mission entries used to cross-check Willow Creek, Rurik, and the Baron trail. Treat runtime journal pages as the stronger primary evidence.
Privacy-sanitized room, player-count, and game/map metadata captured from the public endpoint. This is a point-in-time observation, not a census or unit-position feed.
SHA-256 and byte-count record for the local book, source ledger, knowledge log, learning hub, and public archive assets.
Manual or maintained technical source supports the statement.
Local or Scout evidence is dated and described without overclaiming.
Needs a disposable runtime test, page citation, or stronger source.
08 · RESEARCH QUEUE
These are bounded collection tasks. Each one names the evidence needed and the library section it will update.
Capture page-level text for Willow Creek, Rurik, and Baron Kildaer from the game journal or a cited manual scan. Update the chronology and character records only after the wording is verified.
Next evidence: journal screenshots or page references.
Pair each corrected Vera study with a canonical tag, sprite, and palette reference. Keep the presentation image separate from release-ready game assets.
Next evidence: extracted tag/sprite records with provenance.
Repeat the Scout/Bagrada snapshot, record the date and fields returned, and compare it with the older observation without turning either into a popularity claim.
Next evidence: raw match rows, films, and capture timestamp.
CAMPAIGN JOURNAL SOURCE
Myth Journals is a fan-hosted transcription of the campaign journal. It supplies mission dates, locations, objectives, and dialogue for cross-checking; the game journal or a page image remains the stronger primary proof.
Provides dated entries from Willow Creek through the campaign and links each entry to its glossary terms, objectives, dialogue, and cutscene references.
Monday August 25, near Willow Creek: the patrol is sent to investigate grave robbing and finds the town under attack.
Tuesday September 2, the Keep: the transcript records the Baron’s secret exits and the patrol’s hunt for him.
FIELD METHOD
A short, repeatable tutorial for turning a question into evidence. It keeps presentation art, editor behavior, and game-runtime behavior in separate lanes.
Open the manual, a maintained technical document, or a dated community record. Write down the URL, date checked, and the exact page or entry.
For map or unit work, copy a known-working file and alter one field only. Keep the untouched baseline beside the specimen.
Reopen the file in the editor, then check it in Myth II itself. Editor acceptance is useful evidence, but it is not runtime proof.
Save the diff, screenshot, film, or journal page with the result. Mark the claim documented, tested, observed, or unknown before adding it to the library.
08 · PRESERVATION NOW
The original campaign is fixed history; the surrounding tools and servers are living infrastructure. This reference keeps those layers separate.
Tracks modern operating-system support, online play, King of the Map, mid-game co-op joining, extended zoom, motion interpolation, and the community’s role in maintaining Myth II.
Use the manual for story canon, Project Magma for current tool behavior, and dated Scout/Bagrada captures for community observations. Never merge those evidence levels into one claim.
10 · MISSION-BY-MISSION ROUTE
This route transcribes the 25 numbered entries in the Myth Journals index. The rows preserve the source’s dates and locations; open the index to read each transcript.
The index includes an undated Prologue before these numbered entries. Transcript dates and wording remain fan cross-checks until runtime journal pages are captured.
LOCAL LIBRARY SHORTCUTS
These downloadable pages keep the story, terminology, character connections, and multiplayer practice in one place.